In this post, I’m going to go over how you can get powerful machine learning pipelines up and running without all the headaches of managing the infrastructure. We’re going to be using the orchestration power of dbt along with the ease-of-use of BigQuery ML to have you making predictions on your data warehouse faster than you can say “data”.
What is dbt?
If you’ve been working with data warehousing in the past year or two, you will have probably noticed the increasing hype around one particular tool, known as “Data Build Tool (dbt)”. dbt is a CLI tool for running transformation pipelines, testing, and documentation in your data warehouse.
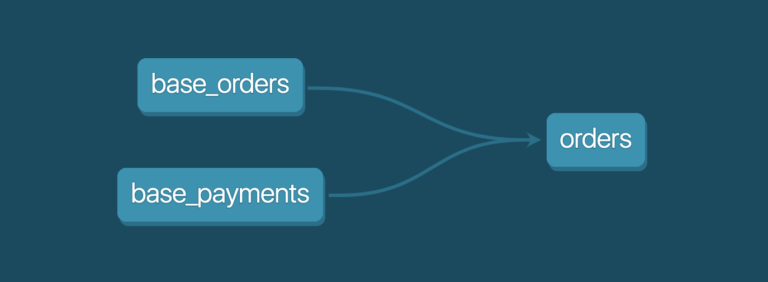
In a nutshell, each stage of your transformation pipeline is called a “model” and is defined in a SQL file.
For example, your orders model might depend on the base_orders model and the base_payments model. Instead of selecting from the tables directly, as you would with standard SQL, you replace the table names with a ref call in the jinja templating language.
The indirection tells dbt how each step is related to other steps and allows you to run any subset of that transformation pipeline with dbt taking care of the execution order defined by the dependencies.
Of course, that is not all you can do with jinja. You have the power of the whole templating language at your disposal, so you can make abstractions over your SQL code to generate code using loops, conditions, etc.
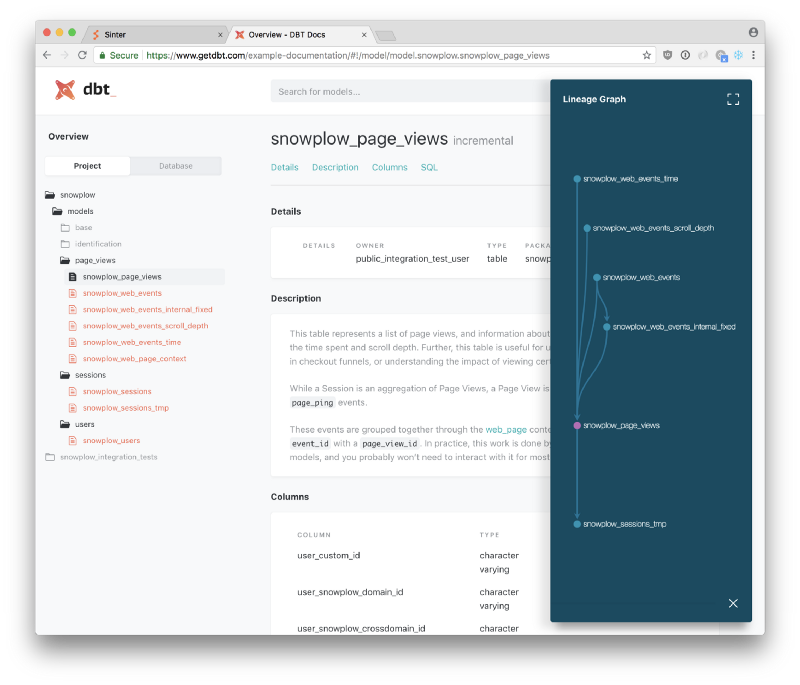
You can also define data tests, schema tests, and documentation as yaml configuration and dbt will generate automated tests and a whole documentation website for you!
What is Bigquery ML?
BigQuery is Google’s serverless data warehouse offering, which is one of the easiest and most user-friendly data warehousing platforms out there.Machine learning usually requires extensive knowledge of specialized frameworks and complex infrastructure, but BigQuery ML lets you use the SQL you already know and love to build a fully operational ML pipeline within minutes on top of the data you already have in BigQuery.As of January 2020, Bigquery ML supports the following machine learning algorithms:- Linear Regression: Used for forecasting using a linear combination of variables.
- Logistic Regression: Both binary and multiclass logistic regression for classification tasks
- K-Means Clustering: An unsupervised learning technique used for data segmentation/clustering; for example, identifying customer segments.
- Tensorflow: Import a Tensorflow model into Bigquery ML
- Matrix Factorization: A recommendation algorithm that can predict a user’s preference for items they have not interacted with before using the preferences of similar users.
- AutoML Regressor: Creates a regression model using Google’s AutoML Tables service, effectively trying multiple regression algorithms and tuning hyperparameters automatically.
- AutoML Classifier: Creates a classification model using Google’s AutoML Tables service, effectively trying multiple classification algorithms and tuning hyperparameters automatically.
- Boosted Tree Classifier: Uses XGBoost for classification.
- Boosted Tree Regressor: Uses XGBoost for regression.
- DNN Classifier: Creates a Deep Neural Network Classifier model.
- DNN Regressor: Creates a Deep Neural Network Regressor model.
- ARIMA: Builds a univariate ARIMA-based time series model for time series forecasting.
As you can see, you have a great degree of flexibility and can skip building a whole bunch of machine learning infrastructure and hit the ground running!
Manual BigQuery ML Workflow
In order to understand what dbt is doing under the hood, it is valuable to understand what a vanilla workflow with BQML would look like without dbt. We’re going to use the popular Titanic survivorship dataset, where we want to predict whether someone survived or not based on features such as age, sex, ticket class, etc.
If you want to follow along with this manual way to work with BigQuery ML, you can do the steps as I list them, however, later in the post I’m going to be going over how to do this with dbt with an example project, so feel free to simply read this section instead!
Step 1 – Upload the Dataset
Download the Titanic dataset from this gist and upload it to BigQuery using the Bigquery console. If you’need some help with this, check out the BigQuery docs for the details.
Step 2 – Create The Model
You can create a simple model by including all the input features in your select and simply naming your target variable as “label”. Here, I’m training only on the first 800 passengers because I’m holding out 91 passengers for evaluating the model performance in Step 4.
After about 30 seconds, you have a fully trained machine learning model named “logreg”! You can click on the model in the BQ console to view the evaluation metrics.
Step 3 – (Optional) View Training and Model Statistics
You can get information about each training iteration, such as training and evaluation data loss, learning rate, and other relevant metrics if you’re interested. Viewing this in the console is as simple as clicking on your model and exploring the training tab.
You can also do this using SQL syntax by running the following query:
This query yields the model-specific training information.
| training_run | iteration | loss | eval_loss | learning_rate | duration_ms |
|---|---|---|---|---|---|
| 0 | 1 | 0.3966145272990062 | 0.49003224377697446 | 2.0 | 1903 |
| 0 | 0 | 0.45377108868357596 | 0.555525331828709 | 2.0 | 1789 |
Step 4 – Evaluate Model
Next, you can get the performance metrics of your model on some dataset you provide.
| precision | recall | accuracy | f1_score | log_loss | roc_auc |
|---|---|---|---|---|---|
| 0.7714285714285715 | 0.7941176470588235 | 0.8351648351648352 | 0.782608695652174 | 0.39050221712413297 | 0.8951608391608391 |
Step 5 – Predict
Now you can easily use your model with unseen data by running predict! I’m gonna pretend to have some “unseen passengers” dataset here and get predictions about their survival.
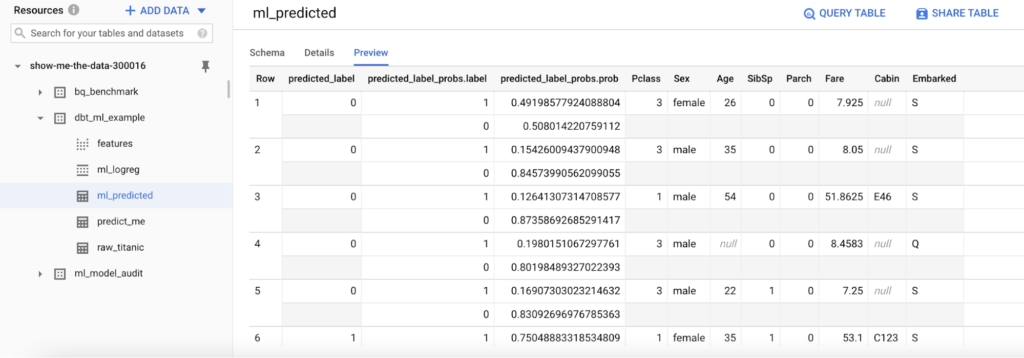
Bigquery will give you the probability for both classes as well as the features used to make the prediction.
| predicted_label | predicted_label_probs__label | predicted_label_probs__prob | PassengerId | Pclass | Sex | Age | SibSp | Parch | Fare | Cabin | Embarked |
|---|---|---|---|---|---|---|---|---|---|---|---|
| 1 | 1 | 0.9446 | 1001 | 1 | female | 38 | 1 | 0 | 71.2833 | C85 | C |
| 0 | 0.05535 | ||||||||||
| 1 | 1 | 0.7504 | 1003 | 1 | female | 35 | 1 | 0 | 53.1 | C123 | S |
| 0 | 0.2495 | ||||||||||
| 0 | 1 | 0.1264 | 1006 | 1 | male | 54 | 0 | 0 | 51.8625 | E46 | S |
| 0 | 0.8735 |
Step 6 – (Optional) Explain Model
Depending on what model you’re using, you can also get some global explainability results from your model.For example, with a Boosted Tree Classifier you can get feature importance using ML.FEATURE_IMPORTANCE, or with logistic regression, you can use ML.WEIGHTS to get the underlying weights used in your model predictions.
Here’s a small sample of the kind of output this query returns.
| processed_input | weight | category_weights__category | category_weights__weight |
|---|---|---|---|
| Pclass | -0.4350833020547311 | ||
| Sex | null | female | 0.9072918279534453 |
| male | -0.6388298046104026 | ||
| Age | -0.01376745004878968 | ||
| SibSp | -0.06631036834072176 | ||
| Parch | 0.14027427700013978 | ||
| Fare | 0.004132334945771332 |
That’s the full lifecycle of making and using a BigQuery ML model, but you don’t want to do all these steps manually every time you’re working with ML models. What you need is an automated way to run these steps as a part of a production workflow.
That’s where dbt comes in!
Using Bigquery ML with dbt
In the machine learning workflow, there are some dependencies between various steps that dbt can handle gracefully. For example, we have to pre-process features, split the dataset into training and test sets, and finally use the model to predict new data points.
This is where we can leverage dbt’s execution engine to run those steps in the right order, and even schedule model training and serving using the same infrastructure that drives our analytics!
You may have noticed that we’re using some syntax specific to BigQuery ML to create the models we’re using.
In dbt, by default, we only write the SELECT portion of our queries, and its materialization, whether as a table, view, or common table expression, is handled by a “materialization” configuration.
For example, to materialize a table containing the number 1 we would write
This would create a table named numbers (the name of the sql file) in our data warehouse. We could have just as easily materialized this as a view:
Under the hood, this is just templatizing the SQL that gets executed to produce something like the query below:
We can leverage the same concept to create a custom materializationto write CREATE MODEL instead, passing in any required options.
Luckily, we don’t have to set up our custom materialization from scratch because Kristeligt Dagblad from Denmark has put together a nice and lightweight dbt package called dbt_ml!
Try it out for yourself
In our dbt example, we’re going to be using the same Titanic passenger survivorship dataset as we did for the manual workflow above. This time, we will train the logistic regression model using dbt and the dbt_ml package.
Let’s get started. If you already have dbt and Bigquery set up, skip to Step 3.
Got 10 Minutes?
Download the Project Files
The best way to learn anything is to get your hands dirty and feel the power of the Bigquery ML and dbt combo for yourself!
Clone the repo1. Ensure dbt is Installed
Since this is a dbt tutorial, you must have dbt installed if you want to try things out.
For Mac users, the recommended way is to do
brew install dbt
You can also install it using pip or from source.
2. Ensure Access to your BigQuery Account
Before we get started, let’s make sure you have access to BigQuery. Anyone with a Google account can set up BigQuery and BigQuery has a very generous free tier so don’t worry about running any costs when messing with this example.
- Go to the BigQuery Console — if you don’t have a Google Cloud Platform account you will be asked to create one.
- Create a new project for this tutorial — if you’ve just created a BigQuery account, you’ll be prompted to create a new project straight away. If you already have another existing project, you can select it from the dropdown in the header bar, or create a new project from there.
- Download and install the Google Cloud SDK using the official instructions. We’re gonna be using OAuth to authenticate dbt with your BigQuery account.
- Activate the application-default account with
gcloud auth application-default login
A browser window will open, asking you to authenticate using your Google credentials. Once the flow is complete, your dbt project should have access to your Bigquery Account!
3. Set Up Your dbt Execution Profile
You need to configure dbt to point to your project. You can do this by copying the profile-example.yml in the example project to ~/.dbt and rename it to profile.yml. The default configuration for dbt looks for the profile file in the mentioned path, but you can always choose an alternative profile path using the –profiles-dir flag.
Now, all you have to do is change the project name to your project
4. Install the dbt_ml package
We have defined the dbt_ml package to be used as a dependency by including the package definition in the packages.yml file.
Now that we’ve defined the package, we need to install it by running the following command.
5. Import the Sample Data
We first need to import into BigQuery the data we’re going to use to train the model, and some sample data to use to predict unseen cases.
You would typically have some existing data to work with, but I’ve included the Titanic dataset as a raw_titanic.csv seed file and some fake people to predict survivorship for in a predict_me.csv seed csv file.
To get the data into BigQuery, run the following command
6. Feature Engineering
In this step, you can take your input data and reshape it to get it ready for building the ML model. In practice, I would build a macro where, given an input table, outputs the SQL to transform the input data into usable features. This way you can use the same macro in your training pipeline as well as your prediction pipeline and have helpful materializations you can use for debugging.
In this toy example, I’m gonna stick to the basics and just remove the name of the passenger and the ticket number, since they have less predictive value.
7. Model Training
Next comes the fun part. Here, we’re going to define a new SQL file that refers to the input features and materializes a model instead of a table.
We can do this by setting materialized=’model’ and simply passing in the configuration we want to pass through to the model training parameters as defined by BigQuery ML.
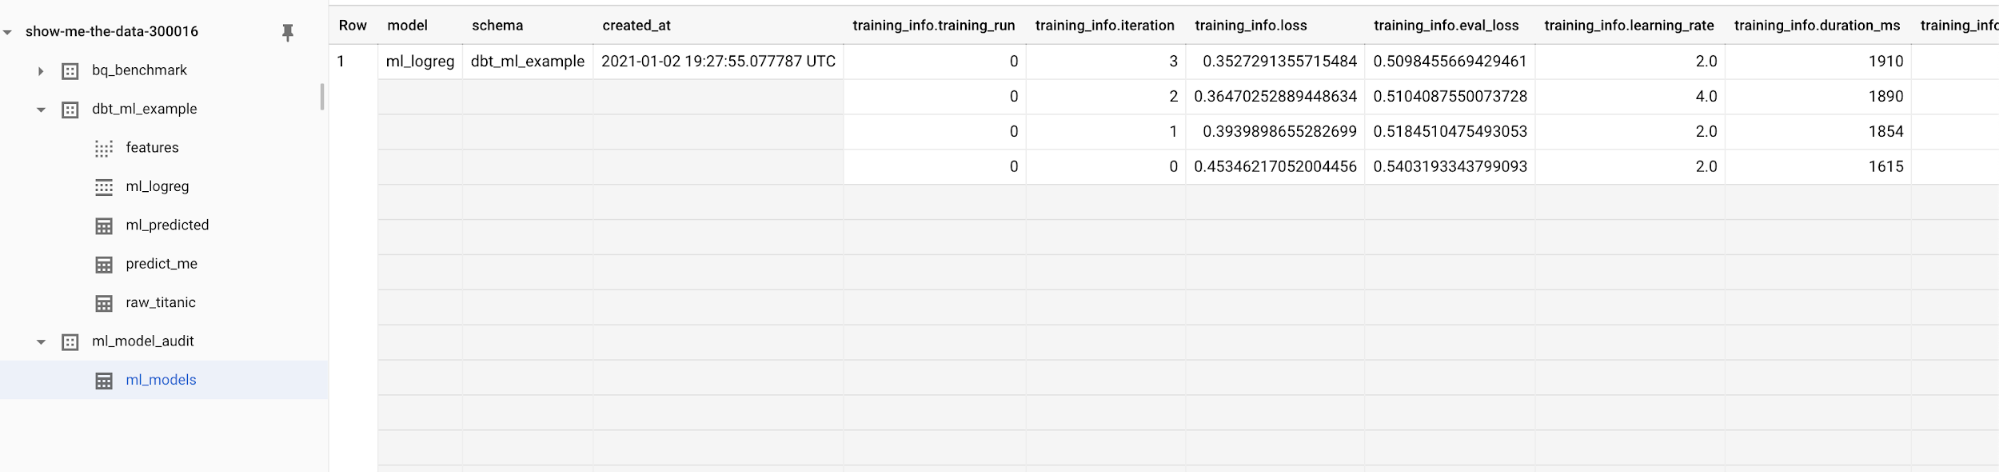
You can optionally pass in a post_hook which outputs the model training and feature metadata into an audit table for keeping track of changes to your model over time. The output of the audit step is defined by the following variables set in your dbt_project.yml
Those variables will be used by our training model to output model audit information to the ml_model_audit.ml_models dataset.
Below is the SQL file that specifies the actual ML model training. In this case, we’re passing configuration for training a Logistic Regression classifier. All we have to do is SELECT the training data to be used, where the target class is in the label column.
Those variables will be used by our training model to output model audit information to the ml_model_audit.ml_models dataset.
Below is the SQL file that specifies the actual ML model training. In this case, we’re passing configuration for training a Logistic Regression classifier.
8. Making Predictions
Finally, we can make predictions on unseen data points we imported as a predict_me table in the seed step. We can do this by using the dbt_ml.predict macro.
Here, in order to make the unseen data compatible with the trained model, I’m simply removing the Name and Ticket columns to get the input features into the same shape that we defined when we trained the model.
We are not excluding the “Survived” column because it’s not available. That’s what we’re trying to predict.
9. Moment of truth – Running Your Pipeline
Now, you’ve defined your DAG and are ready to run and persist it!
Here’s the dependency graph in all its glory.
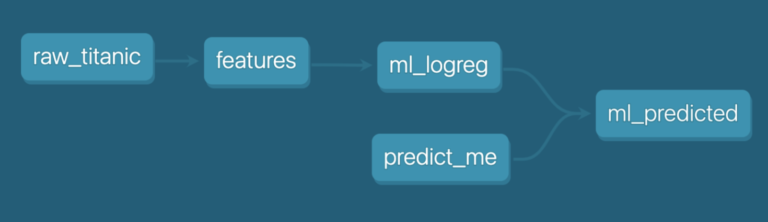
In order to actually materialize the above tables in the data warehouse, we still need to run the following command.
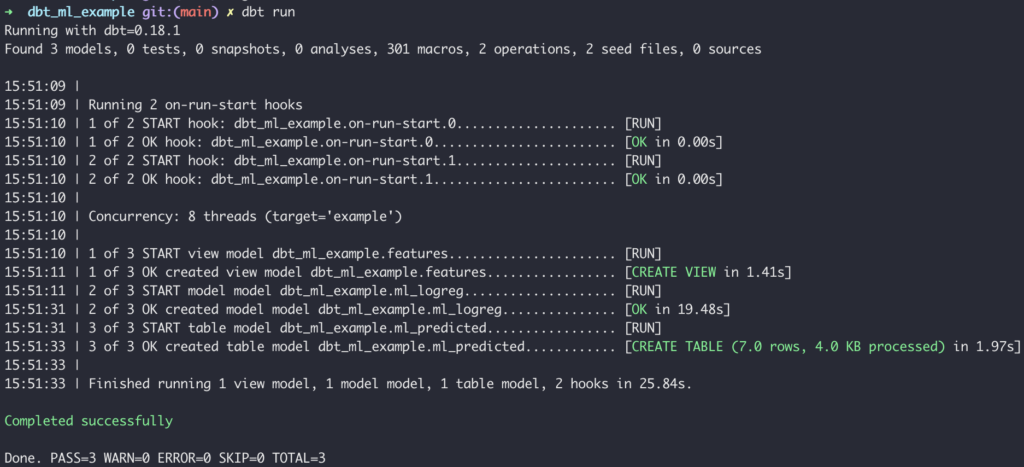
Doing this runs the entire graph, but you can always just run training by adding a tag to the model file like “training” and doing something like dbt run -m tag:training
After your run, you can see your predicted output in BigQuery.
Since we set up the model audit post-hook, we’ll also get an entry in the model audit table. Here you will find training, feature, and model weight information for every model you train.
Conclusion
There you have it: a simple and elegant way to train machine learning models and run batch inferences in BigQuery.
At this point, I want to highlight the key points you need to consider to decide whether or not you want to pursue this as a core strategy in your information pipelines.
Pros (Use if you care about)
- Super easy retraining and leveraging your existing analytics orchestration infrastructure
- Less infrastructure to manage
- Low barrier to entry and fast time to market
- Easily tracking lineage for your models.
- Simple version-controlled data science workflow
- Centralized ML features that are well documented and tested (this part depends on you, but dbt gives you a nice way to do this)
Cons (Avoid if you care about)
- Vendor Lock-In
- Harder to do more complex feature engineering (although many things are possible with jinja + SQL)
- It may be more expensive to run many experiments.
- Not designed for real-time prediction use-cases
Overall, I highly recommend you give this a try and see if it works for you. Everyone’s use-case is different, so a few small experiments can go a long way in potentially opening up the doors to accelerating the productionalization of your machine learning models and, ultimately, delivering value to your customers.